Connecting to the PC
Why and how
One of the most important questions for all vintage computer systems is how to get programs and data from the vintage system to a standard PC computer and back. Why is this important? Here are the main points:
- Vintage mass storage suffers from the ravages of time. Programs and data need to be backup'ed and archived on modern media.
- Sharing programs and data today is done over the Internet. Since vintage computers in most cases won't have connections to the Internet, the PC has to play an intermediate role.
- Sometimes peripherals for the vintage computer system are not available. In this case, the computer can, with the proper connection and software, emulate those peripherals.
- Some operations can be done much better on a PC than on the original vintage system. This includes cross-development as well as several analyzing tasks.
So, if you decide to work with a new old system, it is always a good idea to think about how to connect the vintage system with a standard Windows or Linux PC.
This was the situation for me when I acquired my very first 9845 system. Besides that it needed some repair, the connectivity task was extremely important. Unfortunately there were no practical ways described anywhere in the Web or elsewhere. One way is still shown at hpmuseum.net, but apart from the fact that you need a working 9826 workstation plus 9895A floppy drive, it was not really what I thought about.
One problem ist that the 9845 systems are really old stuff. There is no ethernet card available, no SCSI, no standard centronics printer port and no way to read or write standard PC floppies. But unlike the first glance, the 9845 systems were highly communicative devices. Here are the main alternatives for connecting a 9845 system to a standard PC.
| Alternative | Prerequisites | Advantages | Disadvantages |
| RS232/Serial Link | Either a 98036A or a 98046A RS232 interface plus an adaptor for the connection to the PC serial port | Easy, cheap, reliable. | The 98036A and the 98046A interfaces are rare and hard to find. The transfer speed is limited to 9600 bits/sec. The 9845 does not support mass storage access through the RS232 link. |
| HP-IB | A 98034A (revised) or 98034B HP-IB interface plus a IEEE488 or GPIB interface card for the PC | Easy, fast, reliable. 98034 interfaces are relatively easy to acquire. So are GPIB interface cards for PCs. Mass storage operation over HP-IB is directly supported by the 9845 OS. | No built-in support for HP-IB/GPIB at the PC side, so a GPIB interface is required. |
| Parallel Connection | A 98032A 16-bit-parallel interface plus an adaptor for the PC parallel port. | Cheap, fast, reliable. 98032A interfaces are not as common as HP-IB interfaces but not extremely rare. Some mass storage peripherals (e.g. the 9885 floppy drive) use the parallel connection, so there is native support by the 9845 OS. | The adaptor for the PC parallel port is a bit more complex. The PC parallel port handshake has to be synchronized with the 98032A handshake features. The different parallel port versions and modes make it hard to be sure that the connection will work with every PC. There are numerous options of the 98032A interface, each with its own connector, so adaptors may work with one option but not with the other. |
| Floppy Disk Exchange | Any floppy drive which works with the 9845 plus a PC drive which supports the same media form factor | Fast. | The PC floppy controller has to be manipulated in order to read floppies with HP's 256 byte sector format. Not all PC drives are physically able to read non-standard floppy media. HP's 5.25" and 3.5" floppy drives do not work out-of-the-box with the 9845, and 8" floppy drives for the PC are at least uncommon. |
Since I did own a 98034A HP-IB interface and a 9895A 8" floppy drive, but no 8" floppy drive for the PC, no 98036 or 98046 RS232 interface and no 98032 16-bit-parallel interface I first decided to concentrate on HP-IB. The first thing I needed was a usable IEEE488- or GPIB-interface card for the PC. Not hard to find, but quite expensive, especially the PCI solutions. So I selected a comparably cheap used NEC µPD7210 based ISA board. Besides the fact that the board was only supported up to Windows ME, a link to the 9845 was set up very quickly. Very helpful was a note from National Instruments (who built the card in the early eighties) on how to transfer data files to and from a PC over a GPIB connection. Look here for this note. Initially I used TransEra's HTBASIC application under Windows 98 for the first tests.
Meanwhile I have developed a number of utilities which support transfer over HP-IB as well as via floppy disk. I also made some tests with RS232 connections, however HP-IB and floppy disk exchange are still (from my point of view) the most versatile and performant ways for PC connectivity. If you like to experiment with the 16-bit-parallel connection on your own, I would be interested very much in the results. In addition, there is a kermit implementation for the 9845 equipped with a 98046 RS232 interface. It should be possible to do file transfer (both ASCII and binary) with a kermit capable terminal program on the PC side via RS232, but I did not yet proove that. But for now let's concentrate on the HP-IB and the floppy disk solutions.
PC Connection via HP-IB
The HP-IB was HP's implementation of the IEEE-488 standard, also known under the acronym GPIB (General Purpose Interface Bus). It was originally used to connect measuring equipment with controllers. The basic concept is a link of one single controller and several devices, one connected to each other just like a daisy chain (the same principle is used today with the firewire bus, standards identification IEEE1394). HP soon decided to make HP-IB the standard connection interface for the 9825/9845 and their peripherals. This was a good idea mainly for two reasons: first they could strengthen their market position (HP was almost monopolist for HP-IB measuring equipment), and second the HP-IB was fast, reliable, easy to use, and comparably cheap in production (so to say the best choice for peripheral connection). See the HP-IB Tutorial to get a deeper understanding in how it works.
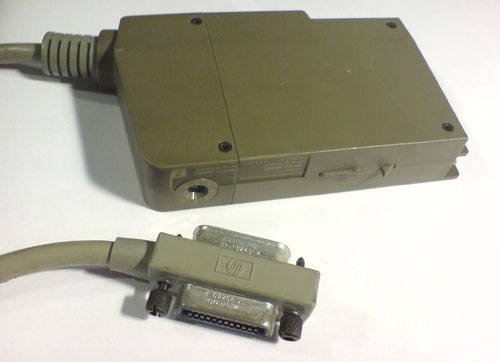
HP98034A HP-IB Interface
Here it is only important to know what you need:
- A 9845B or 9845C with 98034 interface (98034A revised or 98034B, any will do).
- An IEEE488/GPIB PC interface card which can be configured as non-system-controller (ISA or PCI based, depending in what expansion slots you have free, e.g. a NI GPIB-PCII/IIA will do it).
It is really important that the IEEE488/GPIB interface can be configured as non-system-controller. This is not necessarily true for all cards available. So better be sure before you acquire one. Also take care if you use a 98034A, that is revised - or it will not function properly with the 9845.
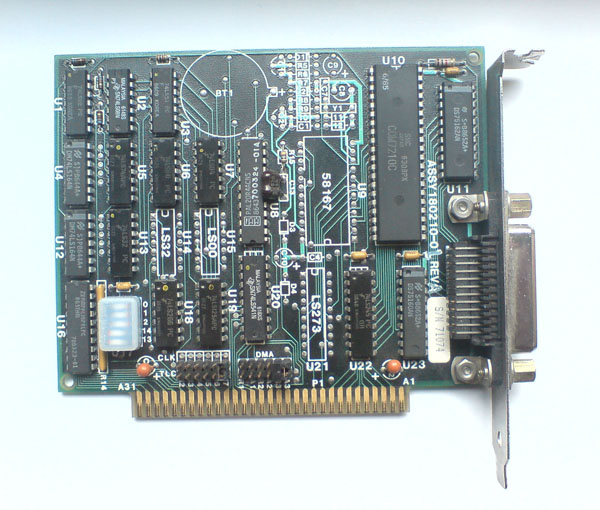
Example NEC µPD7210 IEEE488/GPIB Board National Instruments PCIIA
These are the steps to prepare a connection:
- Be sure the 9845 is switched off.
- Configure the 98034 interface to select code 7 (this is the standard for HP-IB interfaces, there is a small torque switch for the select code on the top of the interface).
- Push the interface gently into any of the 9845 interface slots (no brute force!), the interface should hearably snap in.
- Install the IEEE488/GPIB PC interface card into the PC according to the instructions in the hopefully available card manual. If it can be configured to system controller or non-system-controller during installation, chose the non-system-controller configuration.
- Be sure both the 9845 and the PC are still switched off. Then connect the 98034 interface cable to the GPIB connector of the PC GPIB interface card.
- Power on first the PC, than the 9845.
- Test proper operation of the 98034 interface with the following procedure:
There are several ways to test the 98034 interface. The recommended (since easiest) way is to switch the 9845 on and execute the following statements:
STATUS 7;A,B,C,D
DISP A,B,C,D
The results should be something like
332 0 213 64
The individual values may differ according to the configuration of the interface. If it doesn't show the expected results, try rotating the select code switch to 0 and then back to 7. If you still get an error, the interface probably is not working properly.
Now both systems are connected and should (in principle) be able to exchange data over the GPIB connection. Whereas the 9845 is immediately ready to send and receive data (since HP-IB support is built into the operating system), the PC needs some assistance. One solution is a software like TransEra's HTBasic. It is a great software if you own it, since it provides a HPBASIC 4.0 environment on the PC, which is very similar to that of the 9845 (nearly a HP9826 emulator). With HTBASIC, you can use the same commands to send and receive data on both systems.
Another possibility is to use one of the utilities which I wrote especially for data exchange with HP 9845 systems, for example the HPDrive and the HPDir programs, or Sendfile and Getfile.
TransEra's HTBasic
TransEra's Windows Version of HP's Rocky Mountain BASIC was called HTBasic (HT for 'High Technology'). It quickly filled the market of BASIC programs for instrument control, measuring data aquisition and data processing, since it made it easy to use the large amount of software written in Rocky Mountain BASIC on the Windows platform. This niche proved to be so stable that TransEra still offers and maintains HTBasic, currently with the version number 10.0.
All HP BASIC versions up to TransEra's HTBAsic have in common, that the screen is split into several areas, i.e. a print area, a display line, a keyboard entry area, a line for system messages and an optional soft-key label area. This may appear unconventional with respect to most other BASIC implementations, however it doesn't take long to get comfortable with this unusual feature.
Unusual as well is the editing mode for entering and modifying BASIC programs, at least compared to other BASIC implementations, which use a modeless full-screen editor.
HTBasic is interesting for 9845 vintage computing at least for two reasons:
- HTBasic still is very near to the Series 200/300 HP BASIC standard, which is essentially the old HP 9845 BASIC plus Graphics ROM, Advanced Programming ROM, Structured Programming ROM, and I/O ROM. Including all the development and run-time environment with editor and display line and so on. HTBasic is good to get comfortable with the HP BASIC development environment, and if you ever think about a 9845 emulator, this is already pretty close.
- HTBasic supports a large number of IEEE488/GPIB expansion boards, including ISA, PCI and PCMCIA solutions. Each IEEE488/GPIB controller family has its own driver. So programming the GPIB with HTBasic is an extremely easy task, independed of what kind of hardware you're using.
Unfortunately, there is still no free version of HTBasic for Windows available (even not the first release, I think it was HTBasic 5.0). So if you plan to use the advantages of HTBasic, you should take care that a license is already included when acquiring your IEEE488/GPIB hardware. You can check www.htbasic.com for a limited demo, anyway. There are demo packages for DOS, Windows 95 and Windows XP.
However, although HTBasic is nice, if you got a compatible IEEE488/GPIB hardware, you can use one of the free utilities I delevoped for 9845 HP-IB connectivity instead.
HPDrive and HPDir
HPDrive is a mass storage emulator, running under Windows 9x up to Windows 7. It needs a compatible IEEE488/GPIB card and emulates the most common AMIGO HP-IB drive types (9895A, 82901M and 9121D dual floppy disk drives, as well as a 7910 hard drive etc.). Just launch HPDrive and you can use the PC as a full substitute to a real HP floppy or hard disk drive. All disk data is stored locally on the PC in disk image files. The second utility, the HPDir program, can than be used to extract or add files to/from those image files (and much more). See the HPDrive Project and the HPDir Project for details.
With HPDrive the PC looks for the GPIB bus just like a conventional mass storage device. Therefore, as long as the bus address is not the same, the emulated drive - since it is not configured as system controller - may co-exist together with multiple real mass storage devices on the same bus.
Whereas HPDrive emulates an HP-IB drive, HPDir can be used to directly access other HP drives on the bus without any HP computer involved. In this case, the PC GPIB interface card has to be configured as system controller and plays the role of the host. Files from other HP-IB drives can be copied to PC and vice versa. Note that no two systems in the same bus may work in parallel as system controllers. This prohibits connecting both a 9845 and a PC as system controllers at the same time. Again, only selected IEEE488/GPIB cards are supported.
The 98034 HP-IB interface can transfer up to 40 kBits/sec, which was rather fast for the late 70's (remember the serial connection could handle up to 9.6 kBits/sec).
Testing and using your HP-IB Connection with HTBasic
Once you have properly installed HTBasic, be sure the IEEE488/GPIB board is configured as non-system-controller. Normally, there is a section in the AUTOST file named "GPIB (HP-IB) Drive" with a line where the GPIB driver is configured. It looks something like this:
LOAD BIN "GPIBN;BOARD PC2A INT 5 NOTSYS"
Note the "NOTSYS" at the end of the line, it configures the IEEE488/GPIB hardware (in this case a PCIIA board from National Instruments) as being NOT the system controller. By the way, if this line in the AUTOST file starts with an exclamation mark ("!"), it is outcommented and no GPIB driver will be loaded on HTBasic startup. In this case consult the HTBasic manual how to enable the support for your specific controller.
When HTBasic starts up, it looks pretty much like a 9845 screen (in fact it is practical identical to the user interface of a HP 9000 Series 200 workstation). You can edit programs and execute commands just like on a 9845. Note that some keys had to be re-mapped for the PC, see the HTBasic manual for the key bindings (<break> is STOP, <enter> is both EXECUTE & STORE and so on).
Now here's the first test. Type in and execute
SCRATCH
This clears any program which is currently loaded. Then type in and run the following small program:
10 STATUS 7;X
20 PRINT "GPIB Hardware OK!"
30 END
RUN
If you got a "Interface not present" error, you have to do some more handbook study. If you got the "GPIB Hardware OK!" message, your HTBasic is ready for the next step.
Be sure the 9845 and the PC are connected via HP-IB and HTBasic is running. Then power on the 9845. Now type in and run the following small program in HTBasic (if necessary, do a SCRATCH before):
10 DIM A$[256]
20 STATUS 7,3;Myaddress
30 PRINT "Waiting for messages on address";BINAND(Myaddress, 31)
40 ENTER 7;A$
50 PRINT A$
60 IF A$<>"BYE" THEN 40
70 END
The printed address is the primary GPIB address the IEEE488/GPIB board has been configured to. Normally this is 20 for a non-system-controller. If it is 21, this is a hint that your board is still configured as a system controller and you should check your documentation. In principle, it can be any number except the primary GPIB address of the 9845 (which is factory set to 21).
On the 9845 side, execute
OUTPUT 720;"Hello PC!"
(Change the 720 to 7xx according to the address xx of the PC board)
If everything works well, the message should be displayed within HTBasic. Try some other messages. Finally execute
OUTPUT 720;"BYE"
and your HTBasic program should terminate. Note that the HTBasic program uses the address 7 for the ENTER statement (this just says: "give me anything from the GPIB bus, no matter from which device it is sent"), wheras the 9845 needs a target address to send the message to a specific device (the PC IEEE488/GPIB board). This is because the 9845 is the system controller, who is responsible for all GPIB addressing, and the PC (for the GPIB) is 'just' a device.
You should have now a basic idea how data transfer works between a 9845 and a PC using HTBasic. Here's an appetizer for the transfer of complete program files. Assuming you got a mass storage device with a saved (not stored) program on it (i.e. of type DATA, not PROG), use the following HTBasic program:
100 DIM Filename$[256],Buffer$[256]
110 STATUS 7,3;Myaddress
120 Get_file: !
130 PRINT "Waiting for file transfer on address";BINAND(Myaddress,31)
140 ENTER 7;Filename$
150 IF Filename$="BYE" THEN STOP
160 CREATE Filename$,1 ! Create file
170 ASSIGN @File TO Filename$ ! Open file
180 PRINT "Receiving file ";Filename$
190 Loop: !
200 ENTER 7;Buffer$
210 IF Buffer$="@@@END-OF-FILE@@@" THEN Done
220 OUTPUT @File USING "#,K";Buffer$;CHR$(13);CHR$(10)
230 PRINT ".";
240 GOTO Loop
250 Done: !
260 PRINT "done."
270 ASSIGN @File TO * ! Close file
280 GOTO Get_file
290 END
Note that line 220 appends CR/LF for DOS text files.
Now use this program on the 9845 side:
100 DIM Filename$[256],Buffer$[256]
110 MASS STORAGE IS ":H" ! Sample selector for 9895A
120 INPUT "Target GPIB address? ",Target
130 Get_file: !
140 INPUT "Filename? ",Filename$
150 OUTPUT 700+Target;Filename$
160 IF Filename$="BYE" THEN STOP
170 ASSIGN #1 TO Filename$ ! Open file
180 ON END #1 GOTO Done
190 PRINT "Sending file ";Filename$
200 OUTPUT 700+Target;Filename$
210 Loop: !
220 READ #1;Buffer$
230 OUTPUT 700+Target;Buffer$
240 PRINT ".";
250 GOTO Loop
260 Done: !
270 OUTPUT 700+Target;"@@@END-OF-FILE@@@"
280 ASSIGN #1 TO * ! Close file
290 PRINT "done."
300 GOTO Get_file
310 END
Change line 110 according to your mass storage. Start the HTBasic program, then the program on the 9845. When prompted at the 9845, enter the PC's GPIB address, then the filename. Now the transfer should start. Each transferred line is indicated by one single dot. When transfer has finished, you can send another file or just enter "BYE" to quit.
It is not that hard to write similar programs for the other direction. Granted, the example works only with saved program files and not with stored programs files or binary data (this can be done with the HPDrive program). But as you see, 9845 and HTBasic are working quite well together.
Testing and using your HP-IB Connection with HPDrive
HTBasic is a multipurpose programming and execution environment. HPDrive in contrast just does only one thing, it makes your PC a HP-IB drive which can be used by your 9845 computer. But for most applications, this is the perfect solution.
Setup for HPDrive is pretty simple. Either the proper hardware is available and well-configured, and the program can instantly be used, or nothing will go.
So, first of all, do anything the installation manual of your NEC µPD7210 compatible IEEE488/GPIB board tells you to do in order to configure your board to 7210 mode and non-system-controller (say configure it as device). For the first test it is useful not to have any other devices on the bus except the PC and the 9845. If there is any test program for your GPIB hardware, use it and make sure it works.
Then execute the HPDrive to scan for which installed GPIB hardware can be detected by HPDrive:
hpdrive -scan
A typical result would be:
7210 GPIB hardware found at port 0x02E1
If HPDrive reports supported GPIB hardware, execute it again without any options:
hpdrive
HPDrive will prompt you for two image files to be used as disk space (one for each logical drive), and creates them if necessary. When finished, you get a message like:
9895A drive ready (2x1.13 MBytes)
Now the PC should be ready as a 9895A dual floppy disk drive with primary GPIB address 0. Try formatting one of the virtual disks (be really sure there is NO other device on the bus) with
INITIALIZE ":H7"
This should take not more than one minute. When finished, try creating a file with
CREATE "TEST:H",10
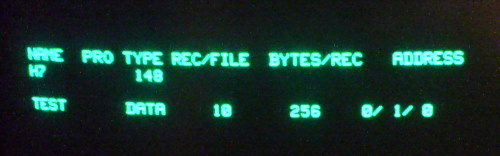
and check the result with a directory listing:
CAT ":H"
The result should look like this:
If one of the steps doesn't work, just terminate HPDrive with CTRL-C and start it again with
hpdrive -l 2
in order to get some more info about what went wrong. Look into the README for things you can do, or just contact me (remember HPDrive ist still beta and I do need the feedback). Type in hpdrive -h to see all options. You can give HPDrive another primary GPIB address with the -a option, but remember not to use the 21 (it is reserved for the system controller) and to use the proper mass storage identifier (msus) at the 9845.
If it did work, you can use the HPDir utility on the image files to add or extract individual files. You can do that while the HPDrive is running, but you should NOT DO IT while HPDrive is in a data transfer with the 9845 host. See the HPDir Project for details.
File Transfer with Getfile & Sendfile
For even more convenience I wrote another two utilties just for file transfer between the 9845 and a PC with GPIB hardware: Getfile and Sendfile. As with all my HP-IB based utilities, these two work with many IEEE488/GPIB boards, especially from National Instruments, but not with every board around. See the 9845 Utilities section for information how to use them.
Data Exchange via Floppy Disk
As mentioned above, reading floppy disk media on a PC which has been formatted on a HP 9845 is not impossible. However, disk exchange is better suited for newer computers like the Series 80 or the Series 200 than for the 9845, and even here some constraints have to be considered:
- The form factor must match. It is (obviously) not possible to read a 8" floppy disk in a 5.25" floppy drive.
- It is not possible to read 9845 floppies with the standard floppy support which is built into DOS or Windows. This is mainly caused by the different sector layout. Fortunately, it is possible to directly program standard PC floppy controllers to handle even this non-standard format.
- It is generally not possible to reliably write a low-density floppy disk within a high-density floppy disk drive. Reason is the narrower track width in combination with different magnetical characteristics. If you need to write low-density HP floppies on a PC, use a low-density floppy disk drive. It is generally recommended to format floppy disks in the vintage drives rather than in the PC drives.
- Most standard PC floppy disk drives can be used to read non-standard floppy disks, but not all. So there is a chance that it will work or will not work with your drives.
Also keep in mind that very old floppy disk media may already become unreadable due to aging. If you need to store data, use new media, or even better, transfer programs and data to more secure media like CDRs.
Here it is what you need:
- A 9845B or 9845C with a floppy disk drive (e.g. a 9895A)
- A PC with standard drives of the same form factor
The HPDir utility mentioned above has already built-in support for non-standard floppy disks, so you can list the contents, copy files from and to the disk, read/restore complete floppies into/from image files, low-level format a disk, create a new file system on it, and much more. It even provides automatic translation of HP 9845 data files into ASCII files and back (including program listings). Look at the HPDir README for details.
Unfortunatly the number of vintage floppy disk drives which can be generically used with a 9845 is limited. There's built-in support only for the 9885 and the 9895A drives, which both use 8" floppy disks. And suitable 8" drives for a PC are hard to find. A workaround is provided by a special mass storage option ROM from Structured Software Systems, which extends the native operating system support to all AMIGO floppy disk drive, including the 82901 5.25" drives and the 9121 3.5" drives. But even worse, this ROM is extremely rare. So if you really want to do data exchange with a PC, using the HP-IB bus is the better choice, unless you own a newer system like a Series 80 computer or a Series 200 workstation.
PC Connection via RS-232C
The probably easiest way to connect a 9845 to a PC is the serial line connection, you just need a 98036A RS-232C serial interface. As mentioned above, the main disadvantages are that
- the 98036A is relatively uncommon and therefore not as easy to acquire as a HP-IB interface, and
- that the 9845 has no built-in operating system support for the serial link, so the link may me used for data transfer, but not for mass storage connection.
However, if you can tell a 98926A your own, here's a short tutorial how to use it.
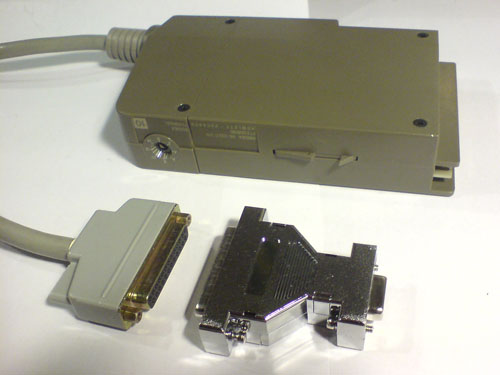
HP98036A RS-232C Standard Serial Interface with DTE Cable and Adaptor
First of all, there are at least four types of serial interfaces for the 9845:
- 98036A standard with DTE cable (female 25-pin sub-d)
- 98036A opt. 001 with DCE cable (male 25-pin sub-d)
- 98036A opt. 002 for use with Distributed Software for System 35/45 only
- 98046A data communication interface
Shortly for the 98046A interface: the 98046A is an enhanced version of the 98036A, basically there's a microcontroller added to the RS-232C logic which provides FIFO's, character conversions and other higher-level features, and it can be programmed. In principle the 98046A should be OK for a serial connection to the PC.
The three flavors of the 98036A (standard, opt. 001 and opt. 002) have the same logic but differ in connectors and pinout. The standard cable can be connected directly to the male 25-pin-jack at the PC. Adaptors are needed for connecting the standard cable to the 9-pin-jack or for connecting the option 001 cable to the PC. The 98036A standard interface needs just a conventional male-25-pin to female-9-pin adaptor, the 98036A opt. 001 needs a null-modem adaptor (or must be connected via null-modem cable with the PC). The 98036 opt. 002 should should not be used for anything else but for the connection to the Distributed Software System.
Here are the pinouts for the standard version (adaptor only needed for 9-to-25-pin connection) and the opt. 001 (adaptor or null-modem cable required):
| PC 9 pin (male) |
PC 25 pin (male) | Signal | 98036A 25 pin standard (female) |
98036A 25 pin opt. 001 (male) |
| 1 | 8 | DCD (Data Carrier Detect) | 8 | 20 |
| 2 | 3 | RxD (Receive Data) | 3 | 2 |
| 3 | 2 | TxD (Transmit Data) | 2 | 3 |
| 4 | 20 | DTR (Data Terminal Ready) | 20 | 6,8 |
| 5 | 7 | GND (Signal Ground) | 7 | 7 |
| 6 | 6 | DSR (Data Set Ready) | 6 | 20 |
| 7 | 4 | RTS (Request to Send) | 4 | 5 |
| 8 | 5 | CTS (Clear to Send) | 5 | 4 |
| n/c | n/c | RI (Ring Indicator) | n/c | n/c |
| Shield | Shield | Shield | Shield | Shield |
Note that connecting the RI (Ring Indicator) signal is not necessary.
Once the systems are connected properly, you can transfer files of type DATA with the following small 9845 program (very similar to that for the GPIB transfer):
100 DIM Filename$[256],Buffer$[256]
110 MASS STORAGE IS ":H" ! Sample MSUS for 9895A
120 Card=10 ! 98036 interface select code
130 RESET Card ! Initialize interface
140 WAIT WRITE Card,5;1 ! Set R5OUT to control mode
150 WRITE BIN Card;64 ! Reset USART
160 WRITE BIN Card;78 ! Write new mode 1/16 9600-N-8-1
170 WRITE BIN Card;32+7 ! Configure USART
190 WAIT WRITE Card,5;0 ! Set R5OUT to data mode
200 Get_file: !
210 INPUT "Filename? ",Filename$
220 OUTPUT Card;Filename$
230 IF Filename$="BYE" THEN STOP
240 ASSIGN #1 TO Filename$ ! Open file
250 ON END #1 GOTO Done
260 PRINT "Sending file ";Filename$
270 Loop: !
280 READ #1;Buffer$
290 OUTPUT Card;Buffer$
300 PRINT ".";
310 GOTO Loop
320 Done: !
330 OUTPUT Card;"@@@END-OF-FILE@@@"
340 ASSIGN #1 TO * ! Close file
350 PRINT "done."
360 GOTO Get_file
370 END
On the PC side, a small HTBasic program can be used to receive the file data:
100 DIM Filename$[256],Buffer$[256]
110 ! Configure RTS/CTS hardware handshake
130 CONTROL 9,5;1 ! Use RTS
140 CONTROL 9,12;128+32 ! Read CTS
120 CONTROL 9,100;0 ! Disable XON/XOFF
150 ! Set communication parameters
160 CONTROL 9,3;9600,3 ! 9600-N-8-1
170 Get_file: !
180 ! Wait for filename
190 PRINT "Waiting for file transfer on COM1"
200 ENTER 9;Filename$
210 IF Filename$="BYE" THEN STOP
220 CREATE Filename$,1 ! Create file
230 ASSIGN @File TO Filename$ ! Open file
240 PRINT "Receiving file ";Filename$
250 Loop: !
260 ENTER 9;Buffer$
270 IF Buffer$="@@@END-OF-FILE@@@" THEN Done
280 OUTPUT @File USING "#,K";Buffer$;CHR$(13);CHR$(10)
290 PRINT ".";
300 GOTO Loop
310 Done: !
320 PRINT "done."
330 ASSIGN @File TO * ! Close file
340 GOTO Get_file
350 END
Don't forget to enable the SERIAL32 driver in the AUTOST file of HTBasic (the standard SERIAL driver may not work).
A simple alternative to the HTBasic program above is just to use a terminal program at the PC side (the standard HyperTerminal will do it). Configure the terminal program to the correct COM port, and set the communication parameters to 9600 baud, hardware handshake (RTS/CTS), no parity, 8 data bits, 1 stop bit. If you like, you can use the record function to save all received data into a file. Then start the program on the 9845 side, and the PC terminal program should capture all the file data. 9600 baud is the maximum transfer speed which is supported by the 98036 serial interface.
It is planned to build RS-232C functionality in my Getfile and Sendfile utilities, too (so you won't need HTBasic or terminal programs). However, programming serial devices under WIN32 is something I've reserved for the future.
There is even a Kermit implementation available for the 9845 (click here for download), which of course could be expected to support both binary and ASCII file transfer in combination with a Kermit program at the PC side, however at least a Basic Data Comm Async option ROM will be required. And, at least compared to the program above, the 9845 Kermit implementation is huge (2139 lines of BASIC code).